Overview
This guide shows you how to configure a counting mat system using the Technis mobile app. During configuration, you'll connect the Gateway to your network, set the number of mats in the chain, and define the counting direction so that in/out counts are recorded correctly for the zone.
Before you start
This guide applies to Intechfloor smart counting mat, Mat 2.0.
| Gateway | Mat |
 |
 |
Before starting, ensure that:
- The Gateway and mats are physically assembled and powered on.
- You have a Technis user account. If you don't have one, please contact support.
- You've installed the Technis app on your smartphone.
- You have physical access to the Gateway (you'll need to scan a QR code on the back of the Gateway and, for Wi-Fi configuration, press the button on top of it).
Step 1: Open the device in the app
- Open the Technis app and sign in with your account.
- Tap the Settings tab at the bottom of the screen, then tap My devices > Mat configuration.
- Point your smartphone camera at the QR code on the back of the Gateway.
Once the Gateway is recognized, the app guides you through the configuration steps.
If your mat is connected to the Internat, you can modify some of its parameters in the mobile app Settings > My devices > Devices, or on the web desktop by going to Settings > Devices.
Step 2: Configure the network connection
The Gateway can connect to the internet using the built-in 4G module, an Ethernet cable or a Wi-Fi network. Choose the option that matches your installation.
Use 4G or Ethernet
If you're using the embedded 4G connection or an Ethernet cable, tap Configure Gateway and follow the on-screen instructions. No additional network setup is required.
Connect to a Wi-Fi network
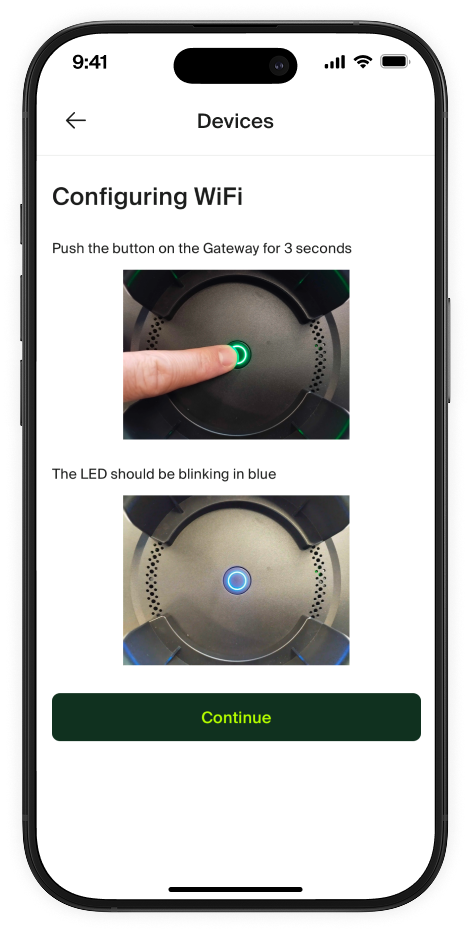
If you want the Gateway to connect over Wi-Fi, tap Configure WiFi and follow the prompts in the app:
- Press and hold the button on top of the Gateway for 3 seconds. The LED starts blinking blue, which means the Gateway is ready to be configured.
- Tap Continue in the app and select the Wi-Fi network you want the Gateway to connect to, then enter the password.
After you confirm, the Gateway reboots and tries to reach the network:
- About 30 seconds of blinking blue while it checks the configured Wi-Fi.
- 5 seconds of steady green if the Gateway connected successfully, or steady red if the connection failed.
- Another 30 seconds of blinking blue while the Gateway reboots into standard operation.
If the LED turns red, double-check the Wi-Fi name and password and repeat the steps above.
Note: The Wi-Fi or Ethernet network must not require identification on a captive portal. If your network uses a firewall, make sure our IPs and URLs are allowed.
Step 3: Name the device and link it to a site
After the Gateway is connected, the device appears on your dashboard with a default name. You can rename it to something meaningful (for example, Main entrance - ground floor). Then:
- Select the site you want to link the mat system to.
- Select the passage that the mats are currently covering.
This tells Technis which location and which passage the counts belong to.
Step 4: Set the number of connected mats
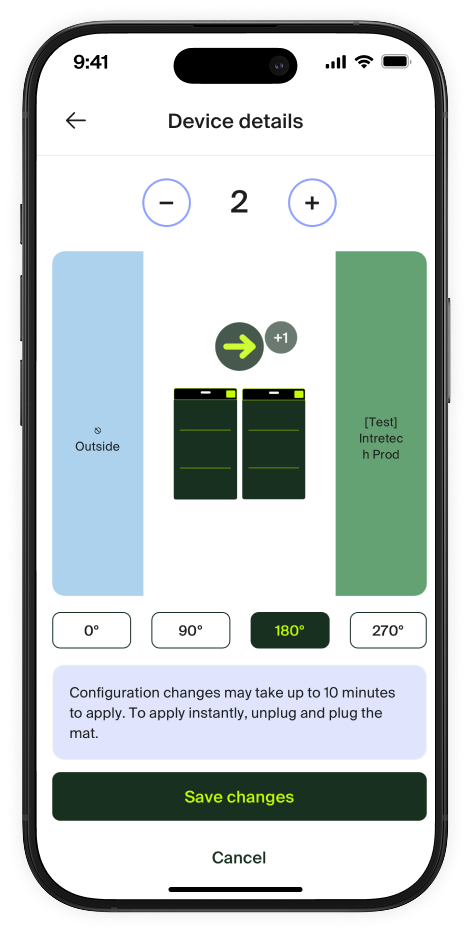
A single Gateway can manage a chain of up to 10 mats connected together side by side. On the Device details screen, use the − and + buttons at the top to set the number to match the mats you have physically connected in the chain.
The number must match the physical installation. If it doesn't, counts may be inaccurate or some mats may not be recognised.
Step 5: Set the counting direction
The counting direction defines which way counts as an In (entering the zone) and which way counts as an Out (leaving the zone).
On the Device details screen, the mat system is shown between two coloured bands: the outside area (light blue) and the zone you selected in Step 3 (green, labelled with your zone name).
- Look at the blue arrow above the mats. It points in the direction that is counted as going into the zone. For example, if the arrow points from "Outside" to "Main area", a person walking in that direction is counted as an In for that zone.
- If your mats are physically rotated relative to the Gateway, select the matching orientation below the illustration: 0°, 90°, 180° or 270°. Observe where the mat's female connector is located (green box on the illustration).
Step 6: Save your changes
Tap Save changes to apply the configuration.
Configuration changes may take up to 10 minutes to apply. To apply them instantly, unplug the Gateway and plug it back in.
Step 7: Verify it worked
After the configuration has applied, the Gateway LED should be steady green, which means the system is working properly and counts are being collected.
Walk across the mat in the "In" direction a few times and check that the count increases on the dashboard for the selected passage.
Common issues
- Gateway LED stays steady yellow: the Gateway doesn't detect any mats. Check that the mats are firmly connected to each other and to the Mat-to-Gateway connector, and that the number of mats in the app matches the physical chain.
- Gateway LED stays steady blue: the Gateway is not connected to the internet. Re-run the Wi-Fi configuration or check your Ethernet cable and firewall rules.
- Wi-Fi configuration fails (red LED): verify the Wi-Fi name and password, and confirm the network does not require a captive portal login.
- Counts are reversed (In/Out swapped): open the device again, tap the mats illustration to rotate it by 180° and save the changes.
Need help?
If the configuration still doesn't work after trying the steps above, contact our support team.